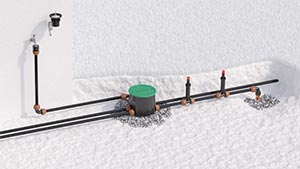
All lines
Above-ground

Drip irrigation

Underground

Online catalogue

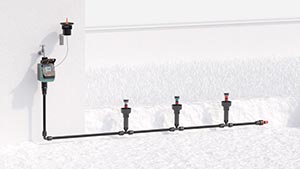
Fasten the timer on the wall in a non-humid room, protected from weathering and splashes of water at a temperature of between 0°C and 50°C. Do not install the timer outdoors or in underground valve boxes.
Multipla can be installed with a bracket.
Multipla can be installed directly on the wall.
When installing the solenoid valves, observe the direction of flow of the water as shown by the arrow and the word “FLOW” printed on the body.
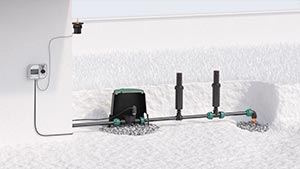
1. Join the single wires coming from either terminal of the single valves to a single wire coming from the timer (valves common).
2. The wires running from the timer to the valves and the Rain Sensor (if installed) must be protected with plastic conduit.
3. Lay the conduit, and route the necessary wires through from end to end.
4. Connect the ends to the respective valves (including the Master Valve, if installed).
5. Make the following connections to the terminal box of the timer, stripping the ends of the wires to expose 5-6 mm, inserting and tightening:
- the common wire from the valves, to terminal C,
- the wire coming from the second terminal of each valve, to terminals 1 … 6,
- the wire coming from the second terminal of the Master Valve (if installed) to terminal MV.
6. If the Rain Sensor is installed, remove the jumper from the SENS terminals and connect the wires from the Rain Sensor in its place. If the Rain Sensor is not going to be used, the jumper must remain in place between the SENS terminals.
Remove the cover on the battery compartment.
Insert the battery by pushing it gently into the casing. Use only a new 9 volt alkaline battery, type IEC 6LR61.
When the battery is inserted, the message OFF will be displayed.
Refit the battery cover. Plug the voltage transformer into a 230 V AC mains power socket.
The battery serves purely to maintain the clock function, and therefore the timing of the selected programme, in the event of a mains power failure.
The test function can be used to perform a quick check on the system that will ensure its correct operation, by activating a given valve manually for a preset duration of 5 minutes. If there is an irrigation cycle running, you can pause the cycle to perform the test by pressing the TEST and START+… buttons at the same time.
Press the TEST button repeatedly to select and activate one of the lines; after a few seconds, the relative valve will open for 5 minutes.
The display indicates the operating mode - “TEST” - the line selected, and the time remaining.
To close the valve being tested before the end of the 5 minutes, press and hold the TEST and START+… buttons for a second.
During a watering cycle, the Multipla activates all the valves on lines 1 to 6 for which a watering time has been programmed using the LINE SELECTORS, opening them in succession and in ascending order.
A watering programme consists in the repetition of a watering cycle at intervals programmed with the FREQUENCY selector.
Having decided which lines are to be activated, turn the LINE selector for each one until it is positioned on the required time. Watering can be programmed for a duration between 5 and 60 minutes. To exclude watering on a given line, position the corresponding selector on • (zero).
To set the watering frequency, turn the FREQUENCY selector to the required position (every 8, 12 or 24 hours, or 2, 3, 4 or 7 days).
To start the programme immediately, press START+…once. The next watering cycle will begin after the time period set with the FREQUENCY selector has elapsed. Timer scheduling is based on when the first irrigation programme starts (START).
Example: pressing the START+... button at 20:00 to activate the programme, with the FREQUENCY set at 8 hours, the next watering cycle will start at 04:00.
To delay the start of the programme, press START+… a second time before 5 seconds have elapsed, to set a delay of one hour, a third time for two hours, and so on up to 23 hours (e.g. 7 hours). The display temporarily indicates the number of hours delay selected, then the watering standby signal appears, along with the time remaining until the start of the first cycle.
When a watering cycle is in progress, the display shows the ongoing symbol, the number of the line currently active and the number of minutes remaining until watering is due to finish on that line. The valve that is open is also shown by the relevant LED flashing green.
Once completed the watering cycle, the standby signal reappears in the display, with the time remaining until the start of the next watering cycle (example of watering cycle with FREQUENCY selector set to 8h).
At 16:30, the duration is selected (e.g. 10 minutes) for all of the watering lines (LINE selectors).
The frequency is set at 8h (FREQUENCY selector).
Suppose that watering is not required immediately, but at 22:30 (i.e. after 6 hours): press the START+… button once, and then six times in succession, so that the display shows 6:00.
The time indicated in the display begins counting down, reaching 0:00 at 22:30; the watering cycle starts, and will then be repeated every 8 hours as set with the FREQUENCY selector (i.e. at 22.30, at 06:30 and at 14:30).
Once the first irrigation cycle is complete (i.e. at 11.30 after all 6 valves have been open for 10 minutes), the remaining time until the next irrigation cycle will show on the display (7 hours), calculated based on the start time of the first line (8 hours from 10.30 to 6.30, 7 hours from 11.30, when the irrigation cycle finishes, to 6.30, the time of the next irrigation cycle.).
To change a watering programme currently in use, enter the new LINE and FREQUENCY settings as required.
Example: with watering in progress and line 2 active, the position of the LINE 2 and 3 selectors is changed (e.g., from 10 min to 20 min).
There will be no change on the duration of the watering step already in progress on line 2, whereas the new setting of 20 minutes will be effective with the activation of line 3. For the next irrigation cycle, both lines 2 and 3 will irrigate for 20 minutes.
Example: Multipla irrigates every 8 hours on 2 lines, for 5 minutes each. If it is 8.10 (Multipla has already irrigated on both lines) and the position of the FREQUENCY dial is changed (e.g. from 8 to 12 hours).
Multipla will irrigate at 4 pm (observing the 8-hour interval saved previously) and then the frequency will change to 12 hours (the next irrigation cycle will run at 4 am).
If the changes apply to longer frequencies (e.g. 2 days), we recommend resetting the device, changing the frequency and resetting the start time. This will ensure the new frequency settings take effect immediately.
The STOP function (press and hold TEST and START+... together for 1 second) interrupts the watering cycle currently in progress. Irrigation will start again normally with the next cycle, according to the set frequency. The STOP function can also be used to close a valve manually, when activated in TEST mode.
The RESET function closes the valve, if currently open, and switches the timer OFF. Watering will be suspended until the START+... button is pressed again, or until a TEST is run. The time is deleted while the run time and frequency remain unchanged. To change them, manually adjust the individual dials.
To RESET the timer, press the TEST and START+… buttons simultaneously and hold them for 10 seconds. The message OFF appears in the display.