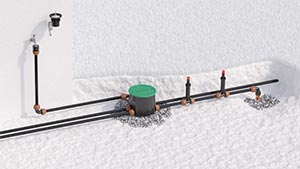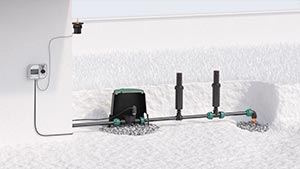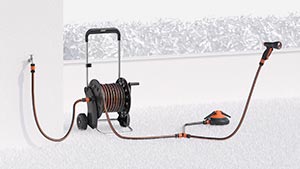
All lines
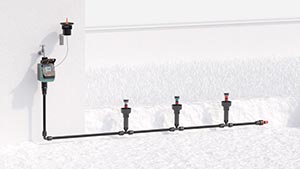
Above-ground

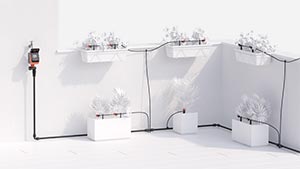
Drip irrigation

Underground

Online catalogue

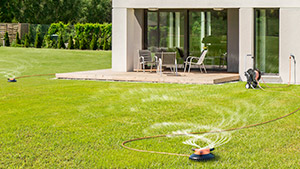
The control module is fully watertight and will function even when installed permanently under water at a depth of up to one metre (ingress protection IP68).
It can be installed in the open, or in a cup underground.
To ensure it is watertight, make sure that the control unit is aligned and inserted in the guides, and that the clear cover is fully screwed on right up to the seal, which must be correctly positioned.
The control unit can operate one or two 9V bistable solenoid valves. The connection to the solenoid valves can be made underground or above-ground. Connect the green wire to the negative pole (black wire) of each solenoid valve (common). Connect the white wire to the positive pole (red wire) of solenoid valve A. Connect the brown wire to the positive pole of solenoid valve B.
The control unit is designed to be connected to a Rain Sensor (cod. 90915). When the rainwater in the sensor exceeds 5 mm, the sensor automatically stops the irrigation cycles, which only restart once the water has evaporated.
Break the connection between the yellow and grey wires, cutting their joined ends.
Connect the yellow and grey wires with those of the rain sensor. Warning: if the rain sensor is not used, make certain that the yellow and grey wires are joined together, restoring the connection, if required.
Unscrew the transparent cover and remove the control unit. Unscrew the cap of the battery housing.
Connect the battery, observing the correct polarity, and replace it inside the housing. Retighten the cap, checking that the seal is positioned correctly in its seat. Reposition the control unit as indicated and refit the transparent cover, checking that the seal is correctly seated in its groove. Important: be sure to replace the battery at the beginning of each season.
When fitting the battery, the display lights up for 4 seconds, the solenoid valves closes, and the timer clock will be set automatically to 00:00.
Press the middle ENTER button; “OK” will show on the screen to indicate that you can now enter the time.
Press one of the arrows to set the time. Press and hold the arrow to speed up programming.
Once you have entered the time, press ENTER to confirm.
The timer allows you to water along two lines, A and B. Up to 3 programmes can be set on each line: line A, programmes 1-3-5; line B, programmes 2-4-6, for a total of 6 daily irrigation programmes.
Note: all programmes are set in the same way. Programmes must be entered in chronological order, within a 24-hour timeframe. The timer automatically advances by 1 minute with respect to the set time, both when OPEN and CLOSED.
Note: if the symbol is flashing, this means the timer is waiting for a command. Press any button.
After setting the day and time press the right arrow to open the page for programme 1 on line A. The time 00:00 will show, preceded by a 1 (for programme 1). Press the middle ENTER button.
You will see “OK” on the screen, meaning the opening time can be set using the arrows (e.g. 05:00). You will see a 1 (for programme 1) at the top of the screen. Confirm the time by pressing ENTER.
Press the right arrow to go to the page “CLOSED”. The timer automatically suggests a closing time 1 minute after the opening time set (e.g. opening at 05:00, suggested closing time 05:01). The time has a 1 before it (for programme 1). Press ENTER.
You will see “OK” on the screen, meaning the closing time can be set using the arrows (e.g. 05:20). Confirm the time by pressing ENTER.
Press the right arrow to open the first programming page (programme 2) for line B. The time 00:00 OPEN will show on the screen, preceded by a 2 (for programme 2). Press ENTER.
You will see “OK” on the screen, meaning the opening time can be set. The timer automatically suggests an opening time 1 minute after the closing time set (for programme 1, 05:21). Press ENTER and use the arrows to choose the desired opening time (e.g. 05:50). You will see a 2 (for programme 2) at the top of the screen. Confirm the time by pressing ENTER.
To close programme 2, follow the same procedure as for programme 1. To set the opening/closing times for the remaining programmes (3-5 A; 4-6 B), repeat the steps above.
Press the right arrow until the weekly programming page is shown. Press ENTER to select the days on which you want to irrigate. All days of the week are selected by default.
Use the arrows to position the cursor under the day you want to enable or disable and press ENTER.
Note: the day settings apply to both lines. Day 1 is the day the timer is set for the first time and is used as a reference. Example: If Thursday = day 1 and the intention is to skip watering on Friday, the day to deselect is day 2.
Position the cursor under EXIT. Press ENTER.
Use the right arrow to open the manual programming page. Manual programming is useful for running an additional irrigation cycle, without deleting the programmes set. The timer automatically sets an irrigation run time of 5 minutes. Press ENTER. Use the left arrow to start irrigating.
To interrupt the cycle before the end, press the right arrow and then ENTER.
Press the right arrow to open the manual programming page for line B. Use the right arrow to return to the initial page (day/time).
To delete a programme, go to CLOSED mode for the programme you want to delete. Press ENTER, then press the two arrows together.
To fully reset the timer, press and hold the two arrow buttons together for at least 10 seconds, until 00:00 shows on the display.
At the end of the season, before the winter frosts, turn off the water and drain the system, manually opening the valves to run off the water remaining inside.
Unscrew the clear cover and remove the control unit. Unscrew the cap on the battery compartment and take out the battery.
Screw the cap back on, checking that the seal is correctly in place. Reposition the control unit using the guide and put the clear cover back on, checking that the seal is correctly in place. At the start of the new season, insert a new battery.